AutomationLinks
This blog post has been researched, edited, and approved by expert Hannah Peake. Join our newsletter below to get our free marketing guides.
4 simple tips for opt-in forms in MailerLite:
- Test Your Form on Multiple Devices: Before finalizing your email opt-in form, ensure it displays correctly and is user-friendly on various devices, including desktops, tablets, and smartphones.
- Implement Tracking Early On: Adding a tracking script to your website allows you to monitor the performance of your form, analyze conversion rates, and make informed decisions for optimizations.
- Optimize Timing and Visibility of Your Pop-Up: Adjust the timing and triggers for your pop-up form to enhance user experience. Consider settings like a delay after page load or activation based on scroll depth to avoid overwhelming your visitors.
- Customize and Personalize the Experience:
Tailor the look of your form to match your brand and personalize the confirmation email for double opt-in subscribers. This helps to create a cohesive brand experience and can increase engagement rates.
Table of contents
- Introduction: Boost Your Email Game with MailerLite
- Setting Up Forms to Skyrocket Your Email Subscribers
- Customizing Your Email Opt-in Form: A Step-by-Step Guide
- Fine-Tuning Your Form: The Art of Customization
- Perfecting the Call-to-Action: Making That Button Shine
- Launching and Optimizing Your Form
- Wrapping Up: Device Compatibility, Tracking, and Engagement
- Conclusion
Keeping Your Customers Engaged
Hey there! Today, we're diving into the world of email marketing, and I'm here to show you how to up your game. Whether you're using MailerLite, like me, or you've got MailChimp, ActiveCampaign, or any other email marketing software, I've got you covered. We're going to tackle setting up an email opt-in form that's designed to do three big things: get you more email opt-ins, reel in more leads, and, ultimately, help you land more customers. Sounds good? Great, let's jump in and get started.

Connect With Us On X
Connect with AutomationLinks owner Brad Smith on X (formerly Twitter) here to learn more about advertising. Feel free to message him with any questions about X advertising and marketing.
Setting Up Forms to Skyrocket Your Email Subscribers
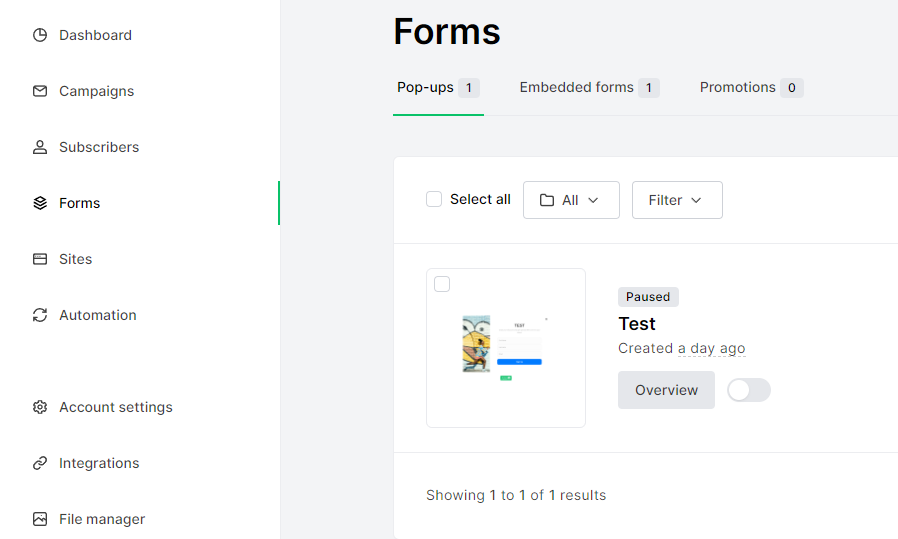
Alright, rolling up our sleeves here, let's dive into setting up those crucial forms on your website. These aren't just any forms; we're talking about pop-ups, embedded forms, and various promotional goodies designed to transform casual website visitors into loyal email subscribers. In my go-to tool, MailerLite (but really, this applies to any email marketing software), the magic starts with finding the "Forms" section. It's like the secret door to growing your email list.
Now, there are a bunch of different forms you can play around with – pop-up forms, embed forms, you name it. But hey, let's kick things off with a pop-up form. Why? Because it's an awesome way to catch your visitors' attention right when they land on your site. I usually start by naming it something simple, like "test" for this example. And boom, you're presented with options for pop-ups or even landing pages. Once you're past the setup phase, these platforms are pretty sweet in letting you pick a subscriber group (don't sweat it, you can always tweak this later) and dive into templates. Templates are gold mines because they save you from starting from scratch and spark some serious inspiration.
Quick Tips for Form Success:
- Keep it Simple: When naming your forms or creating content, clarity is key. You want your visitors to know exactly what they're signing up for.
- Templates are Your Friends: Use templates not just to save time, but to glean ideas on what works. They're designed based on what's effective, so they're a great starting point.
- Focus on Value: Make sure your pop-up or form communicates the value of subscribing. What's in it for your visitor? Exclusive content, discounts, insider info? Highlight that.
- Test and Tweak: Don't be afraid to experiment with different forms and settings. What works for one site may not work for another. Pay attention to your signup rates and adjust accordingly.
Customizing Your Email Opt-in Form: A Step-by-Step Guide
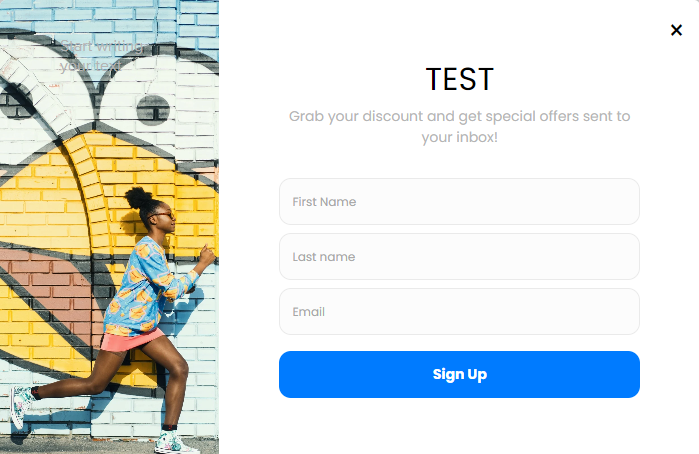
So, you've selected your favorite template. Awesome choice! Now, let's dive into customizing it to perfectly fit your brand and appeal to your audience. The beauty of working directly within your email marketing platform, like MailerLite, is the seamless integration. No messy app integrations here. Your form is already connected to your groups and audience lists, making the setup process as smooth as butter.
Customization is where the fun really begins. With just a few clicks, you can explore various options to make your form stand out. Want to tweak the border? Easy. Feel like testing the form to see how it looks live? Go for it. You can adjust headings, font sizes, colors, links, and pretty much anything else you can think of. Plus, there's a handy text editor to fine-tune your messaging. Once you're happy with the design, hit 'save', and you're almost there. The next step is to swap out the default image with something more you. Simply click on the sidebar background, and you can upload any image from your computer, or choose one from your saved library. It's all about making that form an irresistible invitation to join your email list.
Customization Tips:
- Brand Alignment: Make sure your form reflects your brand's style and voice. Consistency is key to building trust and recognition.
- Clear Call-to-Action: Your form should have a clear, compelling call-to-action (CTA). What do you want the visitor to do? Make it obvious and enticing.
- Test for Performance: Always preview and test your form before making it live. This helps you catch any issues and ensure it looks great on all devices.
- Use High-Quality Images: Choose an image that resonates with your brand and message. High-quality, relevant images can significantly increase conversion rates.
Fine-Tuning Your Form: The Art of Customization
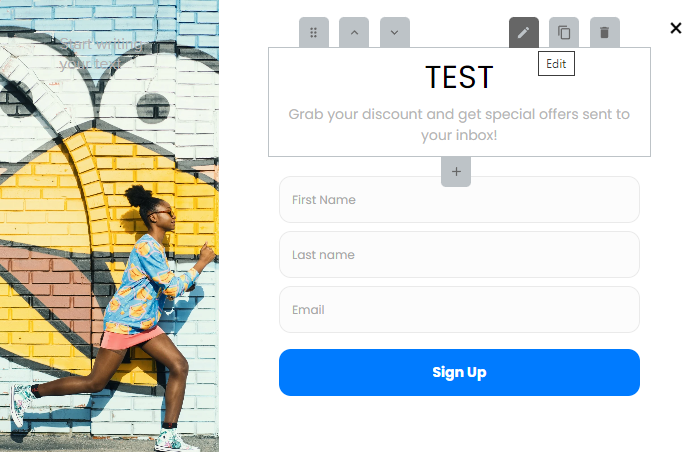
Got your form template all picked out? Great! Now let's dive into the customization details that can really make your form pop and resonate with your audience. When you're ready to start editing, look for the pencil icon - that's your gateway to customization. A small change I love to make right off the bat is adjusting the field order. Personally, I prefer having the name field above the email. It's just a quick drag-and-drop to reorder them.
Adding more fields is a breeze too. Maybe you want to know your subscribers a bit better by asking for their first name, last name, along with their email. Just select the fields you need and edit them accordingly. After hitting save, you'll see your form start to take shape with first name, last name, and email fields neatly organized. And guess what? You're not limited to just the basics. MailerLite (and most email marketing platforms) offers a whole list of fields you can add, from company names to phone numbers, states, and more.
Expanding Your Form Fields:
| Tip | Description |
|---|---|
| 1. Customize for Engagement: | Tailoring your form to include more than just the basics (like adding a first name field) can boost engagement by making your emails more personal. |
| 2. Add Custom Fields | Feel free to add custom fields as you go. |
| 3. Keep It Relevant | Only add fields that are relevant to your business and the relationship you want to build with your subscribers. Too many fields can be overwhelming. |
Perfecting the Call-to-Action: Making That Button Shine
Alright, we've got our form looking pretty good, but there's one crucial element we haven't touched yet: the call-to-action (CTA) button. This little guy is your form's superhero, the make-or-break point for conversions. So, let's give it the attention it deserves. Head back into your form editor, and let's scroll to the place where you set up your success message. Maybe it's a simple and compelling "Get My Discount" or a straightforward "Sign Up." Whatever it is, make sure it aligns with what you're offering and entices the user to click.
Color plays a huge role in making your button stand out. Not feeling the default black? No problem. A few clicks and you can change it to blue, green, or whatever color fits your brand and catches the eye. But don't stop there. You can also tweak the text inside the button, adjust label colors, and if you've added a checkbox (for those opting into something extra), you can customize that too. It's all about creating a visually appealing and cohesive look.
Customization Tips for Your CTA Button:
- Clear Action Words: Use strong, clear verbs for your button text. "Get My Discount" is more compelling than just "Submit."
- Contrast is Key: Choose a button color that stands out against the form's background for better visibility.
- After the Click: Decide what happens post-click. A success message is great for instant gratification, but you can also redirect them to a special page. This could be a thank you page, a coupon code page, or even directly to a shopping collection if you're running an e-commerce store like Shopify. Make it a seamless journey for them to proceed to the next step.
Launching and Optimizing Your Form
Alright, we're almost at the finish line. You've crafted an eye-catching form, nailed the customization, and it's looking cool. Before we call it a day, though, there's one crucial step left: the preview. It's like the dress rehearsal before the big show. Hit that preview button to ensure everything looks as perfect as you envisioned. If you're part of a team, share that preview URL with them for a quick peer review. Getting that thumbs up from your colleagues is always a good idea before going live.
Now, let's talk about making your form live without annoying your website visitors. Nobody likes a pop-up that jumps at them the second they land on a page. It's like being ambushed by a salesperson the moment you step into a store. To keep things friendly, consider setting a delay on your pop-up, like 30 seconds after the website loads. This gives your visitors enough time to get a feel for your site before being greeted with your offer. Alternatively, you can trigger the pop-up based on scroll depth – say, it appears after they've scrolled through 50% of your page. And for the extra touch of user-friendliness, you can even set the pop-up to appear only when someone intends to leave your site.
Optimizing Your Pop-Up's Visibility:
- Timing is Everything: Delay your pop-up or set it to appear based on scroll depth to enhance user experience.
- Frequency Matters: Set how often a visitor sees your pop-up. Once a month is a good benchmark, especially if they've already signed up. No one likes to be pestered.
- Special Schedules: Planning for Black Friday or any special promotion? Schedule your pop-ups for specific events or times to make them even more relevant.
And a quick note on branding – if you're using
MailerLite and want to ditch their default branding on your pop-up, upgrading to their $10/month plan will take care of that. It's a small price for a clean, branded experience.
Device Compatibility, Tracking, and Engagement
Ensuring your pop-up looks great on all devices is critical in today's digital age. With users accessing content from a myriad of devices, from smartphones to desktops, the responsiveness and visual appeal of your form cannot be overstated. After meticulously crafting and customizing your form, the final step before launching it into the world is a thorough review across different devices. This ensures a seamless user experience, regardless of how they interact with your site. Once you're confident in its appearance and functionality, hitting 'save' brings you one step closer to seeing the fruits of your labor.
Implementing tracking is the next crucial phase, offering insights into your form's performance. Whether you're a WordPress aficionado, a Shopify enthusiast, or prefer another platform like Duda, adding a tracking script is straightforward. This process usually involves copying a script and pasting it into the
<head>
section of your site's backend. With tracking in place, you're not just launching a pop-up; you're setting up a comprehensive system to monitor its effectiveness, analyze conversion rates, and make data-driven decisions to further optimize your efforts.
Key Takeaways for Final Touches and Optimization:
- Test Across Devices: Ensure your form is responsive and visually appealing on various screens to cater to all users.
- Implement Tracking: Add tracking scripts to your site to gain valuable insights into your form's performance and user interactions.
- Analyze and Adapt: Use the data from tracking to understand conversion rates. Be ready to tweak and improve your form based on real user feedback.
- Consider Double Opt-In: Decide whether a double opt-in process suits your strategy to enhance subscriber verification, balancing the trade-off between higher quality leads and the potential decrease in sign-up rates.
Wrapping Things Up

And there you have it! We've walked through the whole journey of creating, customizing, launching, and optimizing an email opt-in form using MailerLite. Remember, the goal here isn't just to create something that looks good; it's about making a form that works hard for your website, turning visitors into subscribers, and subscribers into engaged customers. By following the steps and tips we've discussed, you're well on your way to enhancing your email marketing efforts and boosting your online presence.
Launching your form is just the beginning. Keeping an eye on how it performs, listening to feedback, and being willing to make changes are key to ongoing success. Email marketing is a powerful tool, and with the right approach, you can make the most of it. So go ahead, put what you've learned into action, and watch your list grow. Happy emailing!
Remember, every step forward is a step towards achieving your business goals. Whether you're just starting out or looking to refine your strategy, the world of email marketing is full of opportunities. Here's to making the most of every single one.

AutomationLinks
AutomationLinks is a digital marketing agency located in Wilmington North Carolina. We have worked with over 6,000 businesses and nonprofits over the last 10 years. We believe in a relationship marketing approach to help you turn visitors into customers using automation.
Frequently Asked questions
Recommended Software
We are an affiliate of these companies and receive a commission when you purchase.


Recent Posts